1. Open the Sample Contact Form in the Form Builder.
If you would like to customize the form, do so now. If you don’t need to customize it, move on to Step Two.
2. Click the “Save” button and exit the Form Builder.
If you need to change the display options (save & resume, preview response, SSL, or CAPTCHA) or notifications options (thank you page redirects, auto-responders, and email notification), go ahead and do that now. You can also do this later if you find your needs for your form change.
3. Open the Connector tab.
Click the “configure” link next to the Salesforce connector.
Salesforce Connector Setup
Enable the Salesforce Connector
To enable the connector, change the “run mode” option from “disabled” to “interactive”.
Enter Salesforce credentials
Enter your Salesforce username. In the password input, enter your password and your security token. You can obtain a new security token by selecting “Setup” within Salesforce, then “Reset your security token.” Once you’ve entered this information, click “Check.”
Map fields
Once your Salesforce credentials have been accepted, you’re ready to start mapping the fields in your form to fields in Salesforce. In the “Source Type” column, select webform. The “Source” column will be populated with a dropdown menu of all the fields in the form. In the “Salesforce Object” column, select the Salesforce object you want to create or update with the connector. A form can edit or update more than one object. In the “Salesforce Field” menu, select the field that corresponds to the form field in “Source.”
Click “Map a new field” as necessary to map all the web form fields to Salesforce.
Save your connector
Click the save button and you’re done setting up your Salesforce connector for this form.
Start using your form
Once you’ve finished setting up the connector, you’re ready to test your form and get it out to your customers. To do this, go to the “Publish” tab, and click the link to go to your form. Fill out the form and click submit. Within a few seconds you should see the new data in your Salesforce account. Once you’ve confirmed that the form is properly connected to your Salesforce account, your form is ready to be used.
Web-to-lead is one of the most common uses of FormAssembly’s Salesforce integration, but you can also use FormAssembly to update or create almost any type of record in Salesforce. Our documentation provides ideas for other ways to use FormAssembly and Salesforce, as well as providing help for advanced procedures.
Saturday, 28 May 2011
Wednesday, 25 May 2011
How to set background image on button in iphone?
UIImage *blueImage = [UIImage imageNamed:@"blueButton.png"];
UIImage *blueButtonImage = [blueImage stretchableImageWithLeftCapWidth:12 topCapHeight:0];
[btn3 setImage:blueButtonImage forState:UIControlStateNormal];
UIImage *blueButtonImage = [blueImage stretchableImageWithLeftCapWidth:12 topCapHeight:0];
[btn3 setImage:blueButtonImage forState:UIControlStateNormal];
Type casting in iphone integer to String?
NSString *theNumber = [NSString stringWithFormat:@"%d", thisNumber];
How to get Random numbers in iphone?
If you are creating an app with dynamical content, plot, random number is something definitely you need to know. Random number of enemies, random score for each smaller achievement, random number… forget about the reasons you need to know it!
There are few functions in iPhone SDK that gives you random number. The best is arc4random(). Why best? Because, each time you call this function you get the random number, without performing any other randomize procedures.
int myRandomNumber;
myRandomNumber = arc4random();
int myRandomNumber2;
myRandomNumber2 = arc4random();
In above example myRandomNumber and myRandomNumber2 are two different integers, it will be amazing coincident if they are the same.
There is one thing you need to know about it. arc4random() doesn’t ask you about the range of given number, in fact in most cases it returns you the random 8-9 digits numbers (positive or negative). But, using (un)known modulo operation (returns the remainder of division) you can get:
arc4random() % 10 : random number from range <0, 9>
arc4random() % 11 : random number from range <0, 10>
arc4random() % 2 : random number from range <0, 1>
arc4random() % 1000 : random number from range <0, 999>
arc4random() % 1001 : random number from range <0, 1000>
Now, using the know addition you can generate any range you wish:
5 + arc4random() % 10 : <5,14>
100 + arc4random() % 15 : <100,114>
iPhone Change Button Text
The example illustrate how to change the text of UIButton on click. Basically UIButton is a object that is handled by UIControl class, which defines the behavior of all the objects such as UIButton, UILabel, sliders etc..
iPhone Change Button Text
The example illustrate how to change the text of UIButton on click. Basically UIButton is a object that is handled by UIControl class, which defines the behavior of all the objects such as UIButton, UILabel, sliders etc..
UIControl has number of states ...that can be recognized depending on the control.
enum {
UIControlStateNormal = 0,
UIControlStateHighlighted = 1 << 0,
UIControlStateDisabled = 1 << 1,
UIControlStateSelected = 1 << 2,
UIControlStateApplication = 0x00FF0000,
UIControlStateReserved = 0xFF000000
};
In our example we are going to change the text on UIButton on click and selection. To get the desired output we are using two different states of UIControl class...
1. UIControlStateNormal
2. UIControlStateHighlighted
iPhone SDK App - Change UIButton Text on Different States
For Normal State
[button setTitle:@"Normal" forState:UIControlStateNormal];
On selection
[button setTitle:@"Selected" forState:UIControlStateHighlighted];
In the above line of code "setTitle" is setting the title for button in different states... and "forState" will set the desired state.
Change UIButton Text Color: a developer can also change the text color on different states with the help of given code...
[changeText setTitleColor:[UIColor purpleColor] forState:UIControlStateNormal];
Tuesday, 24 May 2011
iPhone SDK: Creating Buttons and Adding Actions & Alert View
Adding button and its handler in Objective-C using iPhone SDK
In JavaScript, it is fairly easy to add a button and its event handlers. HTML and the browser are your Interface Builder and your text editor is your Xcode. There is no need to graphically connect anything and there is no confusion where you add the button and where you add the event handlers. For iPhone programming, the model is more sophisticated and hence it is more complicated to nail the basics. So how do you add a simple button and its event handler in Objective-C and iPhone SDK?
Typically you will want to add a button using the Interface Builder and then add the button’s event handlers in Xcode. Here are the steps:
- In Xcode double click on the NIB file that defines the view to which you wish to add a button. This will start the Interface Builder (IB).
- In IB, open the Library tool and drag a button to the view. Position and resize this button and give it a title.
- Now you need to connect the button to the View Controller class so that you can control and customize this button from Xcode. You can control-click on the button and drag the connection line to the File’s Owner in the xib view (alternatively, you can start the IB’s Inspector, select the Button Connection tab and create a Referencing Outlet – drag the connection similar to before).
- In Xcode you’ll need to define the button to the view controller’s interface file and then define the methods to customize the button and define its events handlers.
In this sample, I’ve added a
UILabel and a UIButton class so that when you click on the button the value of the label is changed.@interface TestViewController : UIViewController {
IBOutlet UILabel *mylabel;
IBOutlet UIButton *mybutton;
}
@property (nonatomic, retain) UILabel *mylabel;
@property (nonatomic, retain) UIButton *mybutton;
@end
In the implementation file, you need “synthesize” the label and button objects.
@implementation TestViewController

@synthesize mylabel;
@synthesize mybutton;
Next I try to customize the label on the button and add an event handler.
- (void)viewDidLoad {
        [super viewDidLoad];
 mylabel.text = @"www.aquacue.com";
 [mybutton setTitle:@"Aquacue - Normal" forState: (UIControlState)UIControlStateNormal];
 [mybutton setTitle:@"Aquacue - Highlighted" forState: (UIControlState)UIControlStateHighlighted];
 [mybutton addTarget:self action:@selector(myButtonClick:) forControlEvents:(UIControlEvents)UIControlEventTouchDown];
}
Now here is the definition of the handler:
-  (void)myButtonClick:(id)sender {
 mylabel.text = @"Clicked";
}
Next I add another event handler so that when you click on the screen background, the value of the label is changed:
- (void)touchesBegan:(NSSet *)touches withEvent:(UIEvent *)event {
    mylabel.text = [NSString stringWithFormat: @"Hello Aquacue %@ %d", @"AAA", event.timestamp];
    [super touchesBegan:touches withEvent:event];
}
You can also use the IB to define event handlers (aka Actions). The easiest way is to actually define the handler/action in Xcode using the IBAction declaration in the interface file (add the declaration just before the @end statement).
- (IBAction)myButtonPressed:(id)sender;
Next you’ll need to define the
myButtonPressed handler in the implementation file:- (IBAction)myButtonPressed:(id)sender {
mylabel.text = @"Change the label, when user clicks on the button";
}
Note that in this sample, I’ve defined two handlers one using the
UIButton addTarget method and another using the IBAction. Both of these handlers are called when the user clicks on the button. As it turns it both of these handlers get called IBAction gets called first followed by the handler that was added viaaddTarget.Only the methods defined with the
IBAction declaration are exposed to the IB. You can control-click on the button object in IB and you’ll see a popup menu that defines all of the events that the object is willing to handle. Using the normal IB way, you’ll need to drag an event to the File’s Owner object to expose the event handler in Xcode.How to create crystal report in .net?
Introduction
This article is about creating Crystal Reports using C#.NET. About two weeks ago, one of my friends asked me for this kind of example. He also searched through the Internet and said that he couldn't find a sample. When I was doing this kind of development, I also looked for samples, but I couldn't find one. That’s why I wrote this article on The Code Project without creating reports separately using Crystal Reports other than using .NET IDE.
Create a Dataset
First you should create a Dataset to get data from the DB. By clicking the “Add New Item” in the “Project” menu, you can add a Dataset. A picture of an added Dataset looks like the following window and you can add elements to the Dataset by dragging and dropping elements from the toolbox. This Dataset is used to fill the data, which it gets from the DB by using a query. Because of that, the names of the elements in this Dataset should be equal to the names of the elements in the DB. For an example, this Dataset can fill using the following query.
String connString = @"Provider=Microsoft.Jet.OLEDB.4.0;_
 Data Source=..\\..\\myDB.mdb;User ID=Admin;Password=";

OleDbConnection conn = new OleDbConnection(connString);
conn.Open();
string query = "SELECT studentID, firstName, lastName, birthDate, _
    address, contactNo FROM studentInfo";
OleDbDataAdapter oleDA = new OleDbDataAdapter(query,conn);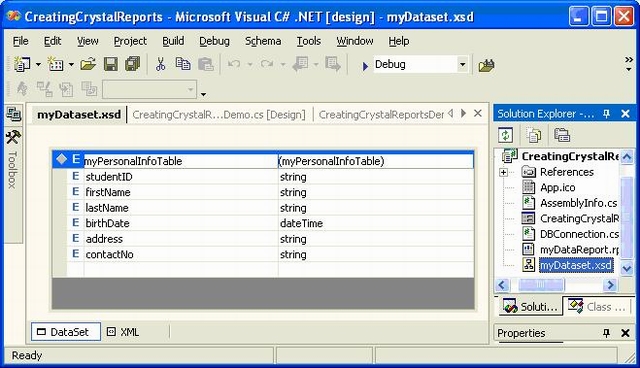
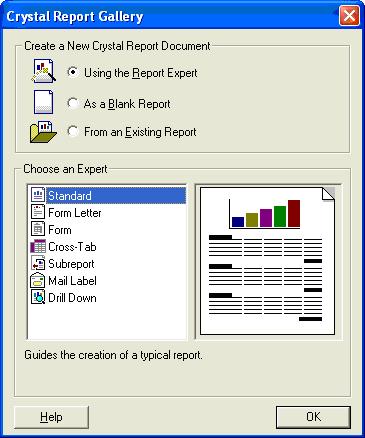
Create a Report using Crystal Reports
Now that we have a created Dataset, we can use it to fill the report with data, which we will be getting from the DB. As I mentioned before, you can add a Crystal Report to the project by clicking “Add New Item” in the “Project” menu. Then the following window will appear, and you can select your choices and click OK.
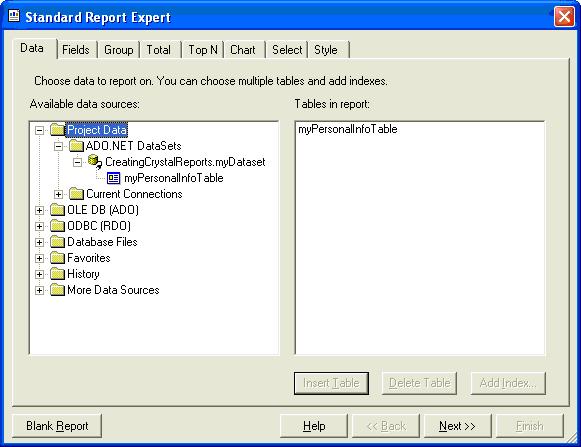
The next window looks like the following and you have to select your created Dataset under “Project Data”, and click “Insert Table”, then click next.
Then you have to add the field, which you want to display in the report through the following window and click next.
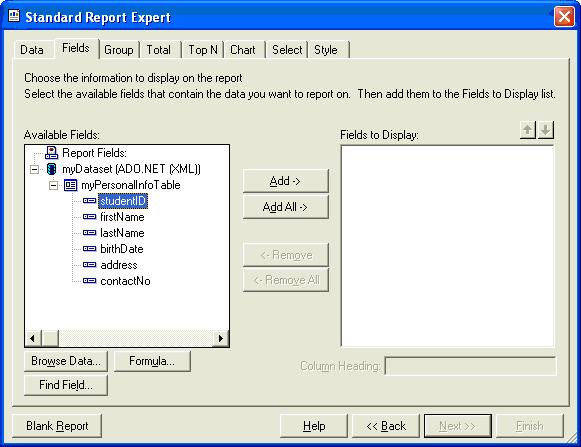
You can also go to other tabs of this window and select/deselect your choices. Use the last tab “Style” to select the format of the report. You can also type a Report Title here and click finish.
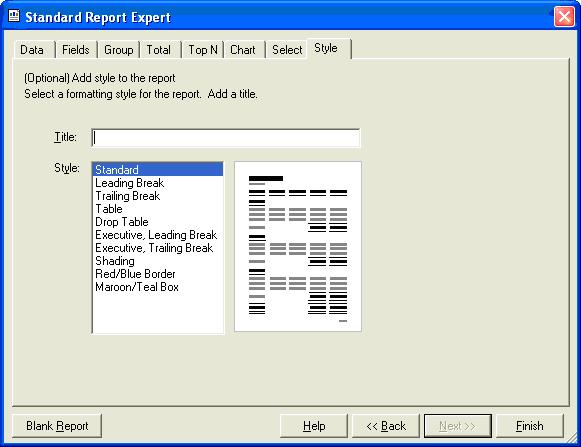
Then your report creation is done by the .NET IDE. If you want to make any changes to the report, you can do so by using the .NET IDE.
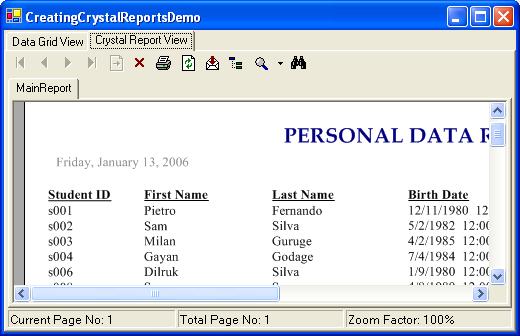
Set the Created Report to Display in the Form
Then you have to set a “
crystalReportViewer” in your form to load the report that you created earlier. Moreover, you need to set the report source of this “crystalReportViewer” component, which falls in the properties panel or you can set the report source by using the code like the following:// code to get data from the DB
DBConnection DBConn = new DBConnection();
OleDbDataAdapter myDataAdapter = DBConn.getDataFromDB();
// use the created Dataset to fill it with data got
// from the DB by using the DataAdapter
DataSet dataReport = new DataSet();
myDataAdapter.Fill(dataReport,"myPersonalInfoTable");
// create a new report from the created CrystalReport
myDataReport myDataReport = new myDataReport();
// set the data source of the report
myDataReport.SetDataSource(dataReport);
// set the report source of the created “crystalReportViewer”
// component to the created report
crystalReportViewer1.ReportSource = myDataReport;how to create start and end Date Datepicker in jquery?
The jQuery UI Datepicker is a highly configurable plugin that adds datepicker functionality to your pages. You can customize the date format and language, restrict the selectable date ranges and add in buttons and other navigation options easily.
By default, the datepicker calendar opens in a small overlay onFocus and closes automatically onBlur or when a date is selected. For an inline calendar, simply attach the datepicker to a div or span.
You can use keyboard shortcuts to drive the datepicker:
This date picker for date range(start and end date) and start from today date.
Add Following script and css in head section:
<link href="css/style.css" media="all" rel="stylesheet" type="text/css" />
<link href="http://ajax.googleapis.com/ajax/libs/jqueryui/1.8/themes/base/jquery-ui.css" rel="stylesheet" type="text/css"/>
<script src="http://ajax.googleapis.com/ajax/libs/jquery/1.5/jquery.min.js"></script>
<script src="http://ajax.googleapis.com/ajax/libs/jqueryui/1.8/jquery-ui.min.js"></script>
<script>
var date = new Date();
var currentMonth = date.getMonth();
var currentDate = date.getDate();
var currentYear = date.getFullYear();
$(function() {
var dates = $( "#from, #to" ).datepicker({
defaultDate: "+1w",
changeMonth: true,
numberOfMonths: 1,
minDate: new Date(currentYear, currentMonth, currentDate),
onSelect: function( selectedDate ) {
var option = this.id == "from" ? "minDate" : "maxDate",
instance = $( this ).data( "datepicker" ),
date = $.datepicker.parseDate(
instance.settings.dateFormat ||
$.datepicker._defaults.dateFormat,
selectedDate, instance.settings );
dates.not( this ).datepicker( "option", option, date );
}
});
});
</script>
Add following HTML in body section:
<div>
<label for="check_in">Check-in</label>
<input class="booking-field" id="from" name="check_in" type="text" />
</div>
<div>
<label for="check_out">Check-out</label>
<input class="booking-field" id="to" name="check_out" type="text" />
</div>
Monday, 23 May 2011
HelloWorld application in iPhone :
Step 1: Download XCode and the SDK
The first thing we need to do is to download the development tools namely XCode and the SDK. To download either of these you will need to register for the Apple ID and Apple developer Connection (ADC). Install both these tools, the procedure to do so is fairly trivial so I am not going into details.

Step 2: Create a new Project
Now we have the tools we need to start coding but before we do we need to create a new project.Select File > New Project orApple Key + Shift + N to bring up the new project menu. Select the Applications item of theIPhone OS section from the menu on the left, and select View Based Application from the icons on the right. When prompted enter a project name, I have used HelloWorld in the sample code.
HelloWorldAppDelegate.h
HelloWorldAppDelegate.m
HelloWorldViewController.h
HelloWorldViewController.m
We do not need to change the HelloWorldAppDelegate but just for information I would like to highlight some important parts of the auto-generated code.
The delegate header file contains a reference to a UIWindow object (Line 14) which controls all the user interaction for this application and will manage all other interface components. It also contains a reference to HelloWorldViewController (Line 15) which we will see later manages our one sample view.
In the source file for the application delegate (HelloWorldAppDelegate.m) we find an auto generatedapplicationDidFinishLaunching method. This, as the name suggests, invoked when the application has been loaded and in this method we will add our HelloWorldViewController object to the UIWindow and make it visible;
22 [window addSubview:viewController.view];
23 [window makeKeyAndVisible];
23 [window makeKeyAndVisible];
The IPhone SDK UI follows the Model View Controller (MVC) design pattern and hence each view has a corrsponding View Controller Object. XCode has automatically created a view for us, (its defined in the HelloWorldViewController.xib file you can see it by double clicking it in the side menu) and linked it to HelloWorldViewController. We now need to add controls to the view handle the generated events. Note we can add controls via a GUI interface called the Interface Builder but I am using the programmatic way for this tutorial.
Step 3: Adding Controls and Handler to header file
Open the HelloWorldViewController.h file and within the curly braces delinting the HelloWorldViewController interface declaration add the following lines;
IBOutlet UIButton *button;
IBOutlet UILabel *label;
IBOutlet UIView *myView;
We are defining a view to display and a button and label to go in the view. After the curly braces add a method declaration to accept the click event of the button and also properties to access the UI elements; myButton, myLabel and myView. Your entire code should look something like this:
1 #import <UIKit/UIKit.h>
2
3 @interface MyHelloWorldViewController : UIViewController
4 {
5
6 IBOutlet UIButton *button;
7 IBOutlet UILabel *label;
8 IBOutlet UIView *myView;
9 }
10
11 -(IBAction)handleEvent:(id)sender;
12 @property (nonatomic, retain) UIButton *button;
13 @property (nonatomic, retain) UILabel *label;
15 @property (nonatomic, retain) UIView *myView;
16
17 @end
Step 4: Adding Controls
First add a synthesize the three UI elements to create the getter and setters. Add the following two lines of code after the @implementation HelloWorldViewController command in line 11 of HelloWorldViewController.m file.
@synthesize button;
@synthesize label;
@synthesize myView;
Now find the comment saying "Implement loadView if you want to create a view hierarchy programmatically." and un-comment the loadView method that follows this line. Add the following lines to the method to create a button and label;
1 - (void)loadView
2 {
3 // create and configure the view
4 CGRect cgRct = CGRectMake(0.0, 0.0, 480, 320); //define size and position of view
5 myView = [[UIView alloc] initWithFrame:cgRct]; //initialize the view
6 myView.autoresizesSubviews = YES; //allow it to tweak size of elements in view
7 self.view = myView;
8 // create a UIButton (UIButtonTypeRoundedRect) and play arround with settings
9 button = [UIButton buttonWithType:UIButtonTypeRoundedRect];
10 button.frame = CGRectMake(100, 100, 100, 50); // size and position of button
11 [button setTitle:@"Add" forState:UIControlStateNormal];
12 button.backgroundColor = [UIColor clearColor];
13 button.adjustsImageWhenHighlighted = YES;
14 //Add action handler and set current class as target
15 [button addTarget:self action:@selector(action:) forControlEvents:UIControlEventTouchUpInside];
16 //Display Button
17 [self.view addSubview:button];
18 //create a label
19 cgRct = CGRectMake(100, 170, 100, 50); //define size and position of label
20 label = [[UILabel alloc] initWithFrame:cgRct];
21 label.text = @"Hello World";
22 //Display Label
23 [self.view addSubview:label];
24 }

Click the Build and Go button to check your interface is drawn correctly It should look something like to screen shot below.

Step 5: Handling Actions
We have already told the button to send an event (action) to the current class (self) in case of anUIControlEventTouchUpInside event but there is no handler defined to accept the event. We define a handler method in the class by adding the method shown below. It is doing two things, changing the text property of the label and adding a message to the log file.
1 -(void)action:(id)sender
2 {
3 NSLog(@"UIButton was clicked");
4 label.text = @"Bye World";
5 }
Now click the Build and Go button again and click the button. The text of the label should change.
Create Tab Bar Icon in iPhone
Tab bars are for toggling between application views. This is a common controller on the screen-constrained iPhone. Not to be confused with toolbars, tab bars are the black bars at the bottom of the screen with gray unselected icons and one blue selected icon. You see tab bars in the phone and ipod and YouTube apps, among others. Here is an example, from the ipod app:

If you can make use of them, you access them via an enum for each defined in the UITabBarItem class. Here is how you would programatically set your tab bar image to the magnifying glass:
When you are creating a tab bar for your own application, you face the problem of providing the icons. You have several options here. Your first option is to use one of Apple's system icons. Like the navigation bar, you have access to some of Apple's system icons, and they even encourage you to use them. Unfortunately, there are a couple caveats with using these. First, the list is pretty skimpy. Second, the icons include the text as well. You cannot set the image and the text separately; it's both or nothing. Here is what is offered:
| icon | text | enum |
| More | UITabBarSystemItemMore | |
| Favorites | UITabBarSystemItemFavorites | |
| Featured | UITabBarSystemItemFeatured | |
| Top 25 | UITabBarSystemItemTopRated | |
| Recent | UITabBarSystemItemRecents | |
| Contacts | UITabBarSystemItemContacts | |
| History | UITabBarSystemItemHistory | |
| Bookmarks | UITabBarSystemItemBookmarks | |
| Search | UITabBarSystemItemSearch | |
| Updates | UITabBarSystemItemDownloads | |
| Most Recent | UITabBarSystemItemMostRecent | |
| Most Viewed | UITabBarSystemItemMostViewed |
self.tabBarItem = [[UITabBarItem alloc] initWithTabBarSystemItem:UITabBarSystemItemSearch tag:0];
- (id) init
{
self.title = "search";
self.tabBarItem = [[UITabBarItem alloc] initWithTabBarSystemItem:UITabBarSystemItemSearch tag:0];
return self;
} - what format?
- what size?
- what colors?
If this image is too large to fit on the tab bar, it is scaled to fit. The size of an [sic] tab bar image is typically 30 x 30 points.Note it doesn't say what the max size is before it gets scaled. One poster thought the max size was around 48 x 32 before scaling happens. But if Apple doesn't publish this information explicitly, I would hesitate to use it. You could explore yourself to find out what the max is, but obviously Apple would like to retain some latitude in this area to possibly change it in future firmware releases. I believe 30 x 30 is a safe size that will give you the best look. There also seems to be a great deal of confusion regarding colors. From my research, colors are basically ignored. Here is what the Apple document "View Controller Programming" has to say about it:
The unselected and selected images displayed by the tab bar are derived from the images that you set. The alpha values in the source image are used to create the other images—opaque values are ignored.In other words, Cocoa Touch will create new images from your source images, using alpha values only. Alpha, in the PNG world, is the degree of a pixel's opacity. Maximum alpha values denote a completely opaque pixels. In the example below this quoted text, they have an example source image and the resulting unselected and selected icons. Color is irrelevant. In part2 of this article, I will discuss various tools used to compose icons, specifically how to create tab bar icons.
HOW TO: Use Social Media During Your Family Vacation

We all have that one family member that just can’t detach himself from technology. On that hypothetical beach vacation, this chap couldn’t be bothered to peel his eyes off his Twitter feed and heaven forbid if you ask him to turn off his iPhone. Then again, maybe that über-connected social mediaite is you.
If you or someone you know tends to spend an entire vacation typing away and staring at backlit screens, it may be time for an intervention. Being “constantly connected” can take a toll on your health — we recommend cutting back on social media and tech usage when you’re on vacation. Everyone needs a break.
If you can’t completely disconnect, your social media proficiency might come in handy when your family is trying to coordinate the trip. There’s a ton of mobile apps that can help improve your vacation, and you’re probably just the person to sharpen up your family’s social media game. Here are our tips for utilizing your connected time for improving your family’s vacation. The next time you’re staring at your smartphone in Tahiti, you’ll at least have a vacation-related excuse.
Sunday, 22 May 2011
Live Webinar May 12: How BrightLine uses Jigsaw :
Looking to improve CRM adoption, data management, and sales productivity? Register now for a Webinar and find out how salesforce.com customer BrightLine used the data import tools and cleansing technology in Jigsaw for Salesforce to solve these issues and more. In just 60 minutes, you'll learn: | ||||||||
| ||||||||
With 26 million contacts, Jigsaw is the leading provider of accurate contact data in the cloud. Studies show that companies can gain 30 days of sales time – per rep – every year by cutting just 60 minutes of wasted time daily; that's where Jigsaw comes in. Be a hero in your company, starting now. |
Subscribe to:
Posts (Atom)